
The Complete Guide to Packshot Photography, 2: Photo Equipment and What You Need to Know
Welcome to the second installment of our comprehensive guide to packshot photography. In this article, we'll cover the essential aspects of camera equipment suitable for packshot photography, as well as the basics you need to know to get the best results.
Whether you are a company looking to maximize the sales of its products online, a beginner professional, or an experienced photographer looking to improve in this field, this comprehensive guide will offer you a real wealth of practical and technical information for successful product photography. Proven tips, helpful tips, and cutting-edge techniques will help you get the most out of your camera equipment and produce professional-quality images.
So, make yourself comfortable, grab your camera, and get ready to discover the secrets of packshot photography.
Camera equipment: What do you need to take packshot photographs of your products?
Make sure you have enough space in your premises in advance
First of all, make sure you have enough space to take your packshot photographs. Indeed, photo equipment takes up space quickly! The space you'll need depends largely on the method you choose to take your packshots:

- If you want to set up a traditional photo studio in your premises, you will need enough space to place all your lights, a platform for your products, the background, photo equipment, etc.
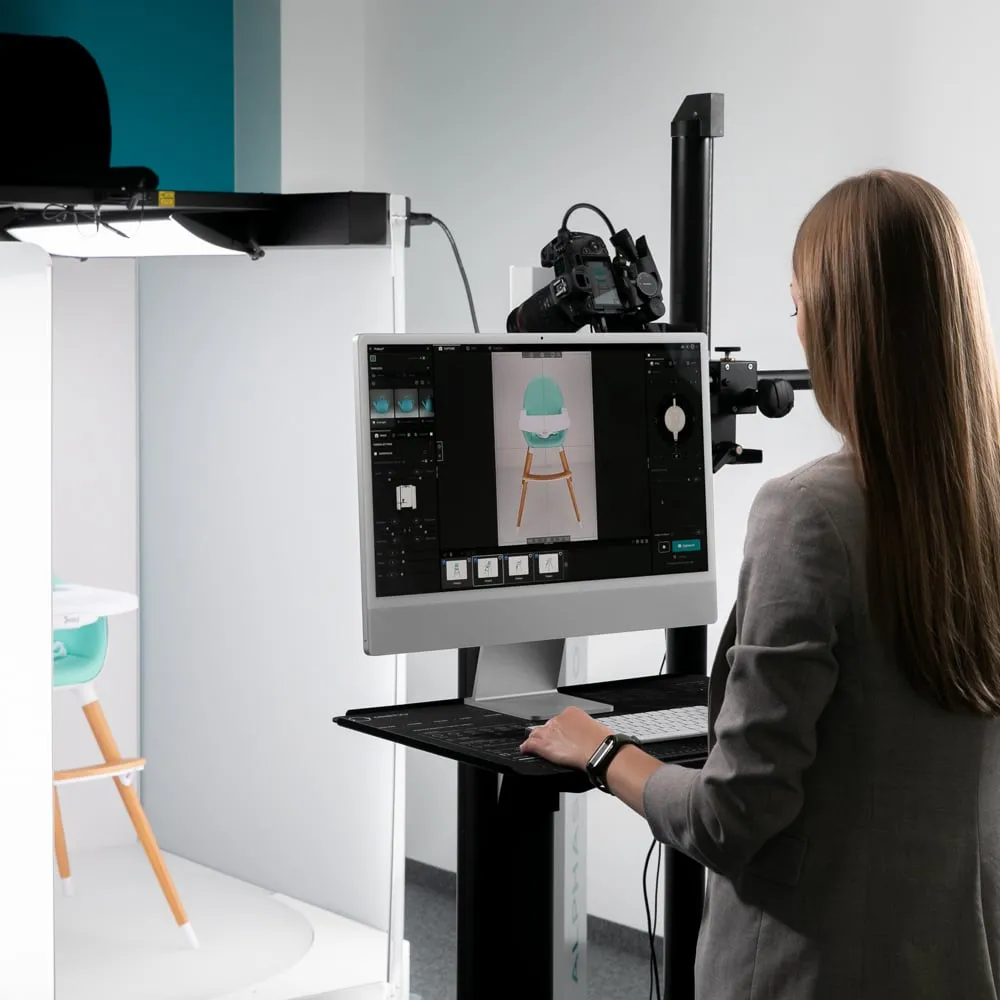
- If you opt instead for a automated photo studio like the ones we sell, know that they benefit from a much more compact format than a more traditional photo studio.
Whichever you choose, you'll also need enough space next to your studio to gather your products before shooting them, as well as a surface to open, prepare and clean them if necessary, and then repack them.
Choose your camera equipment carefully and in particular the camera
For successful product packshot photography, it is crucial to choose the right camera equipment, especially your camera. In the industry of Skincare and cosmetics, a device with excellent color reproduction is essential to accurately represent product hues. In fact, it can make a huge difference in image quality and visual impact.
But what type of camera should you choose? They are in fact available in a wide range of types and prices...
It might be tempting to stick to smartphones, but their image quality is too limited for good packshot photography.

Instead, we recommend investing in a dedicated camera. SLR cameras (DSLR) are widely considered to be the de facto standard for product packshot photography: they offer high resolution images and great versatility.
But what really matters is the sensor size and quality of your camera. This will in fact have a significant influence on the resolution and the level of detail of your photos.
The most common sensor sizes are full frame (35mm wide) and APS-C (24mm wide). For packshot photography, we recommend opting for the APS-C which offers a higher depth of field and therefore a sharper product in the frame.
In addition to choosing the right camera, you'll also need to think about the rest of your camera gear, such as lenses and tripods. For the high-tech, household appliances and computer sector, of macro lenses may be required to capture small components accurately. Lenses are important for getting the right focal length, aperture, and sharpness, while tripods help maintain camera stability and minimize motion blur.
Take care of your lighting
To take quality packshot photographs, lighting is a crucial element that should not be overlooked: the good lighting of your products will allow you to highlight their characteristics, their texture and their details, and thus make them attractive in the eyes of your customers.
First of all, you should know that the ideal lighting for product photography is a soft and even light, without unwanted shadows or reflections. Be careful, this does not mean that you should not leave any shadows in the final shot: a product without a shadow is also a product without depth. On the other hand, care must be taken not to add superfluous shadows.
For this, several solutions and photo equipment are possible: use a light box (also called softbox), place reflective or diffusing panels around your product, or even place lights on either side of your product, preferably using LED bulbs.

It is also important to take into account the color temperature of the lighting used. Indeed, the color temperature of the light can influence the perception of your products. For example, light that is too cold may give the impression of sterility, while light that is too hot may alter the colors of your product. It is therefore recommended to use a neutral white light, with a color temperature of 5500K.
Another detail on the photo equipment side: we also recommend that you work with a tripod to avoid blur, especially if you use a low shutter speed for better brightness.
Opt for a suitable background
When it comes to packshot photography, always use the simplest possible background. The objective is in fact not to distract attention from the product.

An overly loaded or colored background may distract the customer's eye and hinder the presentation of your product. Likewise, a gray or black background can “crush” the product.
So go as simple as possible and opt for a perfectly white and plain background. It will also be even easier to crop the image later in order to obtain a transparent background for other supports!
Ensure the repeatability of your shots
When taking packshot photographs to highlight your products on the internet, it is essential to pay particular attention to repeatability and homogeneity shots. Indeed, for all of your products to be presented in a coherent manner, it is necessary to reproduce a similar shooting pattern for each of them.

However, maintaining this consistency can be a daunting task when working with a traditional photo studio and all the photo equipment that goes into it. The logistics that surround the implementation of each product can quickly become restrictive and make it difficult to obtain an acceptable level of homogeneity.
That is why we strongly recommend that you draw a precise installation plan of your camera equipment by carefully measuring the distances and angles, as well as the various settings used, to ensure that each shot is the same as the last. This rigor will avoid having to retouch each photo individually in the post-production phase, even if it will necessarily take you time in preparation.
Note that if you use one of our automated studios, you can save all your positions and settings to reuse them in one click from one photo to another, making this step totally trivial! You'll also have a lot less photo equipment to take out and replace each time.
Use good post-production software
A powerful post-production software not only makes it possible to remove any imperfections that could alter the quality of the image, but above all it allows you to make adjustments to brightness and sharpness, crop or even remove the background: all essential steps to obtain a perfect packshot.
With this in mind, Adobe Photoshop is a great example of post-production software for editing packshot photographs. After all, this software is recognized for its ability to process high quality images with great precision and flexibility.
However, the use of this type of photo software cannot be improvised. Mastering the features of Photoshop takes time and practice. Learning to manipulate the various image processing options therefore requires a certain amount of expertise that only an experienced user can acquire.
It is therefore essential to take into account the time required for learning to master this type of post-production software. So you need to be ready to invest time and money in training your employees to be able to get high-quality packshots.
How can an automated in-house photo studio be interesting for your business?
Investing in an in-house automated photo studio can be extremely beneficial for businesses due to several key factors.
Homogeneity and standardization
First of all, the concept of flow is essential to fully understand: during the year, product shots are taken according to the calendar, inventory, marketing and others. However, all photos should remain consistent and consistent to reflect a professional brand image.

And as we explained above, this requirement requires a lot of effort when you use a traditional photo studio and all the photo equipment that comes with it... Whereas an automated photo studio is designed to considerably simplify this notion of flow and homogeneity.
In fact, thanks to specialized photo equipment and fully controlled by a intuitive easy to use software, you can easily achieve consistent and consistent photo quality no matter the time of year. Save all your settings and positions in a few clicks, so you can quickly reuse them for all your shots!
A complete and turnkey solution

In addition, an automated photo studio combines all photo equipment into a single system: lighting, background, product positioning, 360-degree views, and post-production. This not only saves a lot of time and manual work, but it also reduces errors and costs associated with photography. You are thus in a position to increase your productivity while ensuring superior photography quality.
Access to multiple media
An automated photo studio also allows you to work with various types of media. In addition to traditional still photos, it is therefore often possible to create 360 degree views, videos, and animations to highlight your products.

Investing in an automated in-house photo studio can therefore offer you numerous advantages. In addition to saving time and costs, using an automated photo studio allows for professional, consistent, and consistent photos, while offering the ability to explore other types of media. However, we will talk more about this in the following articles in this series.
How to take packshot photographs: the basics you need to know
If your business wants to start packshot photography, it's imperative to follow some basic rules to get professional results.
The presentation
First of all, the presentation must be careful: it is important to take the time to properly arrange the product, to place it in an angle favorable to the light and to think about its positioning in the image.
It is also crucial to clean and prepare the product before photographing it. Spots or scratches on the object would in fact have a negative impact on the final image. It may seem obvious, but it can make a big difference when shooting.
The background
Once again, the choice of background is an important aspect of packshot photography. Ideally, use a neutral white background, as it will enhance the product and maintain visual balance. Colored backgrounds can distract attention and compromise image quality. Remember: we have no artistic pretensions here, the primary objective is to promote the product faithfully.
The sharpness

Finally, it is crucial to avoid vagueness over the entire product by using the technique of”Focus Stacking“. This technique consists of taking several photos by changing the focus point each time you take a shot, and then combining them to obtain a clear picture of the entire object. This way, the product is actually represented as it is, and all the sharpness is maintained. If this focus stacking technique is quite time-consuming with a traditional photo studio, know that it can be done automatically thanks to an automated photo studio.
The details
To succeed in quality packshot photographs, you must therefore take care of every detail, use the right shooting techniques, and use the appropriate retouching tools. This is also where you can see how an automated photo studio can make it easier for you to take packshots at every stage.
There are still many other elements to take into account to take good packshot photographs that will really highlight your products, elements that we will see in the following articles:


